Using SCSI to SD Adapter (SCSI2SD) V5 on RM Nimbus PC-186
After I've successfully cracked another unsolved mystery - RM Nimbus Serial Communication with Windows PC, I was wondering how to replace my faulty XEBEC 104786 SCSI SASI to MFM Disk Controller board as well 3 x Rodime R0352 Type 02 10MB HDDs with 34 pin edge connector (P1/J1) & 20 pin edge connector (P2/J2) for MFM ST506 Interface. I've came across to Nimbus PC-186 SCSI to SD page and visited Michael McMaster's page - http://www.codesrc.com. Thinking "That is a perfect solution for my RM Nimbus X10 PC" and started searching on the Internet.
So I've purchased SCSI2SD 3.5" includes 50-pin SCSI to SD Card Adapter (50 Pin SCSI Hard Disk) and paid for £85 via PayPal from eBay on Sat 31st Aug 2019 as well purchasing Genuine Sandisk 2GB Micro SD Memory Card x 2 for £3 each on eBay - Mon 2nd Sep 2019.
I've read SCSI2SD User Manual while using both SCSI2SD Firmware v4.6 and scsi2sd-util program - Windows 64bit. Also I've used Micro USB Charger Data Lead Cable - supplied with my Samsung Galaxy S7 Edge phone (or any mobile phone USB charger cable will do) for connecting SCSI to SD Adapter (SCSI2SD) to Dell XPS 720 PC in order to updating the firmware via USB, plugging in the USB 2.0 micro-B on SCSI to SD Adapter (SCSI2SD) first and then plug directly to Dell XPS 720 PC's USB 2.0 port on the front.
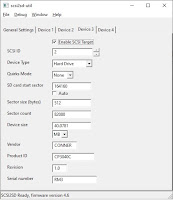
I've configured the settings as follows:
Click [Save to device] for accepting the new configuration changes (as shown above) made to the SCSI2SD board and quit the scsi2sd-util program.
From there, I had to get rid of XEBEC SCSI to MFM converter board while disconnecting SCSI to SD Adapter (SCSI2SD) by removing the Micro USB Charger Data Lead Cable out from Dell XPS 720 PC's USB 2.0 front port first and removing out from USB 2.0 micro-B connector as well, then connect SCSI to SD Adapter (SCSI2SD) directly to fully populated RM Nimbus PN 12865 Issue 3 dual Floppy/HDD SCSI (SASI) Controller Card using supplied 34 way female to 50 way female cable approximately 33cm long that come with RM Nimbus X10 PC, as it's not really long enough to fit SCSI to SD Adapter (SCSI2SD) into internal 3.5" HDD bay, but for now, it'll do for experimenting purposes.
Later in the future, I'm planning to purchase a customised made 4 x 120cm length of 34 way female to 50 way female cables as well both SCSI2SD V5 3.5" External Enclosure Holder Mount and 3.5" to 5.25" Bracket - Front Hard Drive Bay Bracket Adapter for fitting SCSI to SD Adapter (SCSI2SD) onto external 5.25" disk drives with built-in power supply.
Use either PC186WEL - A (396K) or PC186WEL2 - WELC B (500K), in this case, I've inserted my home-made RM Nimbus Welcome Disk Ver. 3.00C from RM Nimbus PC186 Software - B (500K) that I've prepared earlier back in 24th Nov 2014 into the disk drive, allowing RM Nimbus to load automatic, pressing F9 to Quit Welcome program and type 'config' on the system prompt, then press F2 for Drive allocations as well pressing F4 and F8 keys (or F2 and F6 if required) to get the same setting as the following screen shown below:
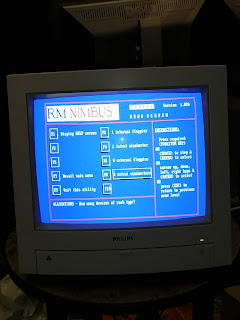
afterwards, press F9 and then F2 to save the changes permanently. Now remove PC186WEL2 - WELC B (500K) from the drive and this time insert Nimbus Winchester Format Tools into the disk drive, type: 'hdform4' and press the RETURN key. Press 'G' key, then RETURN to confirm, keep pressing the RETURN key, you'll get the following screenshots as shown below:
From there, press the number '0' key to select 0 = Internal drive 1 {Controller 0 Drive 1} - CP3040A (C:\) and press 'y' to format drive and press RETURN key to confirm. Same as 'hdform' program except instead of waiting for 5 minutes, this program will wait for 15 seconds - Lovely and sweet, then starts checking for defects and formatting the C:\ drive, please ignore this error message at the end as shown below:
Press any key i.e. RETURN key to restart and repeat the same step above, this time press number '2' key to select 2 = 1st External drive {Controller 1 Drive 1} - CP3040B (D:\), pressing 'y' key to format drive and press RETURN key to confirm, you'll get the following screenshots as shown below:
and ignoring the error message at the end and repeat the same step for selecting 4 = 3rd External drive {Controller 2 Drive 1} - CP3040C (E:\), pressing 'y' key to format drive and press RETURN key to confirm, ignoring the error message at the end and repeat the same step for the last and final time. This time you'll be selecting 6 = 4th External drive {Controller 3 Drive 1} - CP3040D (F:\), pressing 'y' key to format drive and press RETURN key to confirm, ignoring the error message at the end but press 'Q' key to quit.
Next, type 'stamp' and press RETURN key, allowing to prepare partition blocks on all winchester hard drives by itself and you'll receive this following screenshot at the end as shown below:
Press any key to re-boot, still leaving Nimbus Winchester Format Tools disk inside the disk drive, type: format c: /s and press the 'Y' key for yes for formatting the C:\ drive to DOS format as boot drive in the normal way.
After the c: drive has been formatted successfully, you'll see the following message:
Formatting.......
Format complete
Initialising
disk, please wait
System
transferred
Volume label (11 characters, ENTER for none)?
41725952
bytes total disk space
69632
bytes used by system
41656320
bytes available on disk
Press RETURN key, then repeat the same step except this time type: format d: and press the 'Y' key for yes for formatting the D:\ drive which it takes approx 1 min & 43.18 secs to format the full 40MB HDD partition. When that's done, repeat the same step by typing: format e:
Unfortunately, if you're trying to format the 'E:' drive, you'll receive the following message:
RM Nimbus MS-DOS Format Utility Version 2.0A
Cannot read winchester partition table
Format failure
A>
It's very annoying but there is absolutely nothing you can do about that, except move on and type format f: and press the 'Y' key for yes for formatting the last F:\ drive. Using Conner CP3040 as maximum native size drive available, you'll get 40MB per drive, making it a a total of 120MB in three hard drives - C: D: & F: out of 160MB as drive E: is totally unusable.
In my case, this makes 3 x External XW40 40MB Winchester Hard Drives if they're available to buy, but I seriously doubt that. Lucky for me, I've got one of them came with RM Nimbus PC-186 PC2 from Matt.
When all the formatting process has fully complete, you're now ready to remove Nimbus Winchester Format Tools disk out from the disk drive and pressing CTRL, ALT and DEL keys to reboot, allowing your RM Nimbus to boot from the hard drive - C: working perfectly as shown below:
Your work is now done!!
Update on 20/1/2020:
So good that, I've purchased another SCSI2SD 3.5" 50Pin SCSI to SD Card Adapter - great for Amiga - Free P&P ! except it has comes with SanDisk 4GB SD Card and adapter for £59.99 via PayPal from eBay. Tested on RM Nimbus X10 PC, this time, I'll use it for RM Nimbus PC-186 PC2 from Matt.
Update on 12/2/2021 02:08:
I've come with an idea for solving unsolved "Using SCSI2SD on RM Nimbus PC-286 / 386 M-Series via MCA SCSI Card" case mystery with the help of IBM Fast SCSI-2 Adapter/A as shown in Tube Time on Twitter. For more details, please check out my Facebook posts as shown below:
I've come with an idea for solving unsolved "Using SCSI2SD on RM Nimbus PC-286 / 386 M-Series via MCA SCSI Card" case mystery with the help of IBM Fast SCSI-2 Adapter/A as shown in Tube Time on Twitter. For more details, please check out my Facebook posts as shown below:
Currently working on with writing a blog for this project but still work in progress.
Update on 4/3/2021:
I've come up with probably a first time solution for my RM Nimbus PC-186 PC2 with External
XW40 40MB Winchester Hard Drive by replacing the 5.25" drive inside XW40 with SCSI2SD as mentioned in Facebook RM Nimbus User Group post. And my upgraded XW40 idea has worked perfectly with
3 x 40MB HDD partitions as mentioned in another Facebook RM Nimbus User Group post.
3 x 40MB HDD partitions as mentioned in another Facebook RM Nimbus User Group post.
Update on 13/3/2021:
I've managed to [Load from device] my configuration settings for RM Nimbus PC-186 and here it is now available to download - use WinRAR software to extract the file and use by clicking on File
> Open file... and select the XML file to load up my configuration
settings and click [Save to device] without any more settings required!
Update on 25/3/2021:
Nice of Matt has made me a customised 3 x 120cm & 1 x 180cm
length of 34 way IDC female socket connector to 50 way IDC female socket connector cables for
SCSI to SD Adapter (SCSI2SD) - see pics below that Matt has send me via WhatsApp.


No comments:
Post a Comment